This is the first in a series on common mistakes on your bike…
I’ve been thinking about a series of posts about common mistakes that most everyone (even some shops) makes on bicycles. I’m going to give this a stab here and see how it goes. I’ll be focusing on mechanical mistakes as well as those that may effect comfort, handling, or safety. I don’t know how many parts there will be – this will just sort of evolve. If you have a suggestion or something you’d like to see covered: leave a comment and let me know.
IN THE BEGINNING…
So, let’s start at the front of the bike – and with an important contact point: the handlebar.
This is the control center of your bicycle. Almost every control command; braking, shifting, and steering, must go through the bars in one way or another. Sure, there are other ways to control the bike by shifting weight and changing position on the bike – but when you really think about it; most of these maneuvers require some sort of interaction with the bars too. So, how do you set up your handlebars for maximum effectiveness? I’ll start with road drop-style bars and the move to flat and riser mountain-style bars.
 First, some guidelines: Always use caution and NEVER do this while riding the bike. Preferably you will have the bike set in an indoor trainer for these steps for easy adjustment and self-evaluation. Always use a torque wrench set to manufacturer’s recommendations when tightening bolts – especially on carbon fiber and lightweight aluminum. This is implied any time I say to tighten the bolts. Any longer, nearly 99% of bolts on bicycles are metric. Use a metric wrench. If you are not certain about anything, consult with an experienced, professional mechanic.
And this article is by no means a substitute for a bike fitting or visit to the mechanic. This is meant to be a guide to help you identify some of the mistakes that may be present on your bike and give you a starting point to solve them. Consult with a professional for a solution to your unique problem. I mean, come on – you really expect me to solve your problem through a blog? 🙂
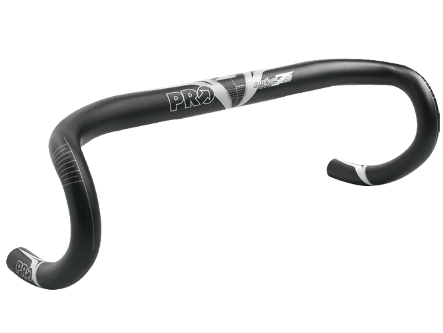
ROAD “DROP” BARS (Click photos to enlarge)
First: since my specialty is bike fitting – if you are not certain that your handlebars are in the right position, consult with a bike fitter. Just messing with different stem lengths or angles is a waste of time and money. Even if you don’t pay for a formal fitting: get a fitter’s advice. Let them see the bike and describe your problems. An experienced fitter can sometimes get 90% of the way to a better position by seeing your bike and maybe seeing you sit on it. Perfection is found in that last 10% – but 90% is better than what a lot of people are tolerating.
Now, maybe not the biggest mistake – but the one that has been haunting me lately is poor handlebar rotation and brake/shift lever position. Often, the source of this problem is actually when the bike is packaged at the manufacturer’s assembly facility. (Yeah, I’m going to throw that stone – you bet. Even the manufacturers are not perfect; and sometimes they need to be told so…) Many road bikes arrive in the store partially assembled. This means that the shifters are often already installed on the bar and the bar tape is already wrapped. If the shifters are not in the proper location; this is a time consuming thing to correct (and occasionally costs the shop a roll of bar tape) – but has a huge effect on the rider’s comfort.
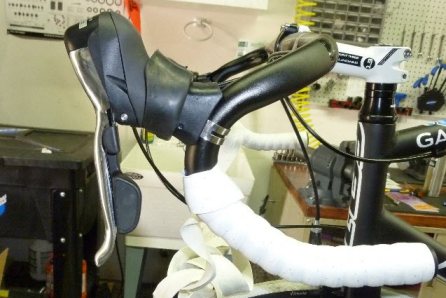
How do we get this right? (This is one of my favorite bike fitting “tricks”) Start with setting the rotation of the bar in the stem clamp. Loosen the stem’s faceplate bolt(s) just enough that you can barely rotate the bar in the stem. The handlebar is now loose – be very careful and do not do this while riding. Sit on the bike and grasp the bar in the drops – the lowest position available on the handlebar. Giving no regard to the position of the shifters and reach to the brake levers (these will be adjusted later); rotate the bars up and/or back until you find a position where the drops are most comfortable and usable. (Caution: this may damage the graphics on the clamp area of the bar or scar the clear coat of a carbon handlebar – you did it to yourself: not me. Don’t say I didn’t warn you…) Frequently, this ends with the extension of the drops falling into a plane that is nearly horizontal. The “old school” method of setting bar rotation used to be to point the end of the drops at the rear brake – nearly the same result as this; and somehow we got away from it. Once you’re satisfied: tighten the faceplate bolt(s).
Usually, this results in a significant downward rotation of the bars and will put your brake/shift levers in an uncomfortable and unusable position. This next step may require unwrapping the bar tape. (You may want to have new bar tape ready to go; as tape often tears when it’s being unwrapped. Not much feels or looks better than new tape anyway…) You will need to move your levers up on the handlebar to bring them back to a usable position. Carefully loosen the levers’ clamp bolt (which will have varying positions depending on the model – consult with a shop if you have questions).
Also – don’t ride this way. (Duh, I know – but you gotta be careful these days…) Move the lever upward until you reach some combination of the following criteria: the transition from the top of the bar to the rubber hood of the lever is smooth and as flat as possible; the lever position creates a perch which allows you to grasp it with your hand in a neutral, almost “handshake” orientation; and there are no extreme bumps, angles, or arcs which create pressure points or voids which are not comfortable. All of which will vary slightly depending upon the 1) shape of the curvature of your bar, 2) model of levers, and 3) preferred position and 4) anatomy. I will use a level to make sure they are in the same position. (There are very rare situations in which they may not need to be – consult with an experienced fitter.) Finally, carefully tighten the levers’ clamp bolt. Then re-wrap your handlebars (starting at the end of the drop – wrapping toward the center-line of the bike: perhaps this is an idea for another post…). You may want to have new bar tape ready to go; as tape often tears when it’s being unwrapped. Not much feels better than new tape anyway…
If you got this right, (and your bars are in a good position to begin with) you should notice improved access to all parts of the handlebar. This method does occasionally result in more difficult reach to pull on the brake levers themselves – especially on “compact drop” bars and for riders with small hands. If you are noticing this: consult with an experienced fitter or mechanic to see if there is a brake lever shim available for your levers to move your levers closer to your bar and adjust the brake cable appropriately.
MTB/FLAT/RISER HANDLEBARS:
Mistakes are less common on mountain bike and hybrid type handlebars – they’re just less mysterious and finicky. But, we still see occasional issues here. Just like road bike handlebars; rotation and brake lever position are the most frequent problems.
The first things to understand when positioning this style of handlebar is that most all of them have certain degrees of “rise” and “sweep”; even the flat handlebars. Rise is the amount of upward offset of the ends of the bars in relation to the center clamping area. Even some flat bars have a little bit of rise. Sweep is the amount of offset back toward the rider from the plane of the center clamping area. Sweep will often vary from model to model and some bars are offered in different degrees of sweep. This rearward, angled offset is most useful in matching the grip area to the natural angle of your hands when you grasp the bar.
Use a similar technique to position flat bars as you would a road drop bar. Start with setting the rotation of the bar in the stem clamp. Loosen the stem’s faceplate bolt(s) just enough that you can barely rotate the bar in the stem. The handlebar is now loose – be very careful and do not do this while riding. Ideally, you have the bike set up in an indoor trainer. Sit on the bike and grasp the bar at the grip area. Giving no regard to the position of the shifters and brake levers (as these will be adjusted later); rotate the bars up and back until you find a position where the bar is most comfortable and usable. (Caution: this may damage the graphics on the clamp area of the bar or scar the clear coat of a carbon handlebar – you did it to yourself: not me. Don’t say I didn’t warn you…) This will most frequently result with the top of the bar being horizontal to very slightly tilted upward when correct. Once you’re satisfied: tighten the faceplate bolt(s).
Next, re-position your brake levers and shifters. Loosen their relative clamp bolts to allow them to freely rotate. Locations and wrench sizes will vary by model. Consult with a mechanic if you have questions. Noting again, that this may damage the finish on your bars. Sitting on the seat; reach to your bars and find a comfortable position. Note the angle your hands naturally take if you extend your fingers. Your brake levers should be positioned so that they sit perfectly at this angle so as to be easily in reach from a neutral, relaxed, natural position. Angled too low or too high requires too much movement and adaptation to allow for quick, safe, comfortable braking. Adjust your shifters accordingly as well. (Twist-style shifters like SRAM Grip-Shift or Shimano Revo are easy, just put them where you can easily read the gear indicators). Again, the left and right sides should be in the same position. There are extremely rare situations where they may not need to be in the same place. Consult with a professional fitter if you have questions. Once you are satisfied, tighten the clamp bolts.
If you are concerned about the width of your bar – how far apart your grips and brake levers are apart – consult with a fitter and knowledgeable mechanic. Various solutions exist – but depend upon whether your handlebar is compatible and may include cutting.
OTHER HANDLEBAR MISTAKES OR PROBLEMS:
-Off center: graphics on the bar are not to be trusted 100% of the time. Measure from the end of the bar to the edge of the stem clamp and move until the measurement is equal on both sides.
-Shifters/brake levers in different positions from a crash/incident: using the methods described above; adjust the errant lever until it matches the correct one.
-Slipping: stem clamps’/faceplates’ bolts should be tightened to equal torque with equal space on top and bottom (except with specified by manufacturer: i.e. Salsa’s “stiff upper lip” faceplate construction). If slipping continues after checking for appropriate, manufacturer recommended torque with a torque wrench; consult with a mechanic who may apply “friction paste” grease or recommend a handlebar/stem change.
-Creaking: on older bikes with a steel handlebar, this is often the result of a bar with a “sleeved” clamp area and cannot be resolved without changing bars. Otherwise, try removing, cleaning, and greasing all bolts and clamping surfaces – using friction paste where appropriate – and re-assembling to proper torque with a torque wrench.
-Over-tightening: use a torque wrench! There are good ones available for $20-$150 which is less than the cost of that carbon handlebar or seatpost you’re about to crack. Just do it. (Ritchey Torq-key: $20-$25 {5nm only}; PRO Torque Wrench: $125-$135 {3nm-15nm )
If there are other issues you have or are pet-peeves of yours – leave a comment and I’ll reply or post an update with some solutions.
I hope this is helpful.
Thanks for reading!